The Horror Continues
OR: The Rise of Marks Gone Bad
No, we’re not just updating our previous article about crop marks and pretending this is something new. So put on those cheaters if you need them and keep reading.
Many publications include ads or other types of files that are provided from outside sources. A lot of these files include crop marks. For the most part, that’s a good thing. Unfortunately, many of these ads are produced without a necessary understanding of how printing works. What we see most often is that the crop marks are much too close to the trim corners. Frequently they also have copy that is too close to the edges, so the margins don’t meet the requirements of the press where the job will print.
The marks from these placed ads need to adhere to the same standards as the marks generated when the publication PDF is created; they need to start outside of the bleed. Crop marks that are cutting into the bleed are diminishing the usable amount of the bleed by that much. When they’re too close to the corners, there is a chance pieces of them will appear in some of the finished printed product.
What are your options if you get a preflight report flagging these issues?
Option 1: ask the provider of the file to send a new one with proper margins and crop marks that are offset far enough. Although this should be the easiest fix, we’re fully aware that it’s not realistic in many cases. So…
Option 2: pull in the bounding box so the marks aren’t visible and then reduce the entire image to create a .25 inch white border around the page. Advertisers who paid for a full-page with bleeds aren’t going to like this option. You’ll need to be certain whether or not an ad can receive this treatment. If not…
Option 3: enlarge the ad slightly to push the crop marks out so they appear outside of the bleed. Caution: you have to be sure that enlarging it doesn’t push text or critical images (such as logos) too close to the edges.
Option 4: if enlarging is not an option, you can try to hide or cover up the marks. Can you pull in the bounding box so that the marks aren’t visible? Obviously this won’t work if there are bleeds. Can you cover up the marks? If the background behind the marks is white or a solid that you
can easily duplicate, maybe you can draw small, matching boxes over the marks.
Option 5: if the background is complicated, you can take the file into Photoshop and use the tools there to erase or clone over the marks. Keep in mind the file will now be rasterized, even if it was originally a vector format such as PDF or EPS. In this case you want to preserve the quality of the original, so we suggest opening the file in Photoshop with a resolution of at least 600 dpi to prevent pixelating or bitmapping. If you have questions about crop marks, please contact us!
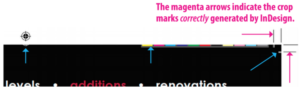
The bleed is .125 inches. Not only are there pieces of corner crop marks visible in
the bleed area, parts of the color bar and the center target mark are showing,
too. With so many elements contaminating the bleed, there’s a risk that some of
them will be visible in the finished product.

